Introduction to Meal Prep
What is Meal Prep?
Alright, let’s start by cutting through the noise—meal prep isn’t just about cooking a week’s worth of meals on Sunday while listening to some podcast or whatever. It’s an art, really. I like to think of it as mise en place for your entire week. You’re basically setting yourself up for success by organizing ingredients, prepping components ahead, and sometimes even fully cooking meals that you’ll grab on busy days. In my tiny home kitchen — which, trust me, isn’t much bigger than a shoebox — meal prep transformed chaos into calm.
Benefits of Meal Prep (Time-saving, Healthy Eating, Cost-effective)
If you think meal prepping sounds like a lot of work upfront… yeah, I get that. But let me hit you with some facts: it saves an average of six hours per week — time you can spend binge-watching something good or actually sleeping in on weekends. Plus? It’s a powerhouse for healthy eating because you control what goes into each dish; no mystery sauces or sneaky calories hiding there. And cost-wise? You’re buying in bulk smartly so waste drops by up to 25% — I learned this back at the restaurant where I worked in Chicago. They hated wasting food almost as much as they hated bad service.
Addressing Common Meal Prep Concerns (Food Safety, Variety, Boredom)
“But Marcus,” I’ve heard many say (actually my sister keeps saying this), “won’t all those prepped meals get boring?” Well actually—here’s the secret—variety is totally doable if you plan right. Also… don’t panic about food safety! Proper handling keeps your eats fresh for 3-5 days refrigerated if you keep them between 34-40°F (1-4°C). At least that’s what CDC recommends—and yeah I’ve had my fair share of near-misses with botched leftovers back then but every mistake is a lesson.
Essential Meal Prep Equipment
Storage Containers (BPA-Free, Airtight, Different Sizes)
You gotta have containers that won’t leak or make your fridge smell funky – seriously avoid cheap plastics with BPA—it’s not worth it. Glass containers are perfect especially since you can reheat directly in them without transfer drama—I know microwaves get a bad rap but honestly microwaves can be useful in professional kitchens too!
- Airtight seals = moisture lock + odor block = fresher food longer
- Multiple sizes help portion control; plus stacking is life when space is tight.
- Stainless steel ones last forever but aren’t microwave-safe—trade-offs everywhere.
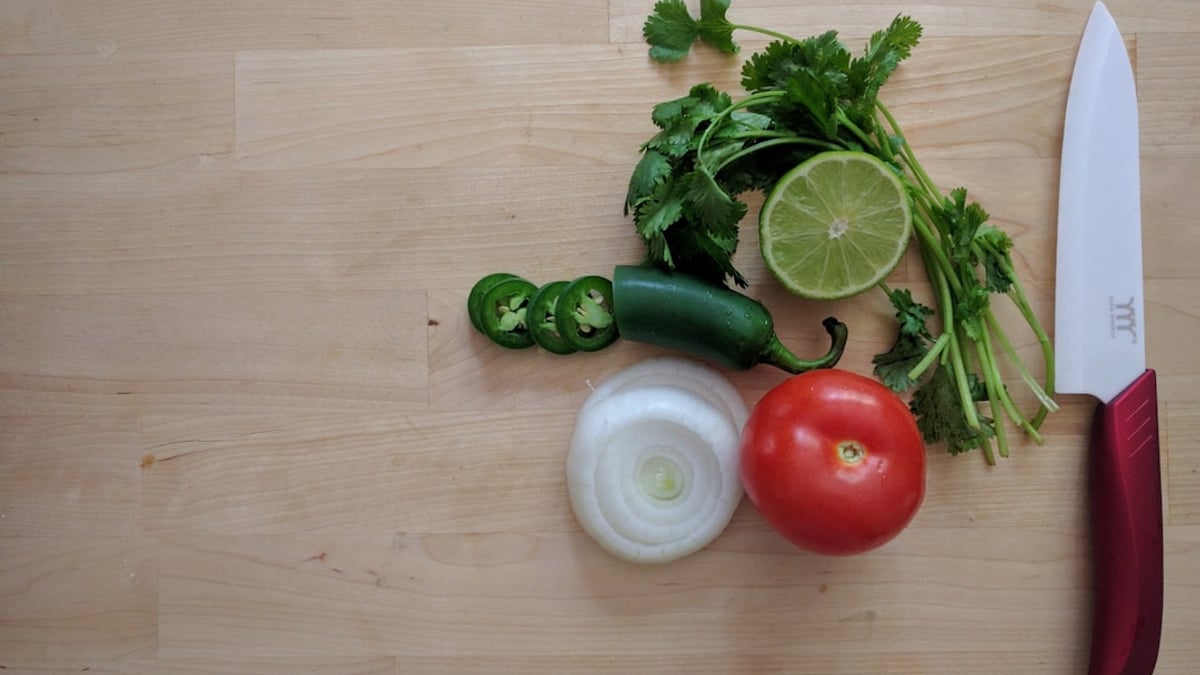
Knives and Cutting Boards (Types, Maintenance)
This one’s huge. A sharp knife makes everything faster *and* safer — dull knives cause slips and accidents which I’ve seen plenty during my chef days at that Chicago spot… probably half the ER visits were from guys who didn’t respect their knives enough!
- A chef’s knife around 8 inches is versatile.
- Separate cutting boards for meat & veggies avoids cross-contamination – don’t skip this!
- Maintenance tip: honing steel regularly and sharpening once every few months keeps blades razor-sharp.
Cooking Appliances (Instant Pot, Slow Cooker, Air Fryer)
I’m gonna be straight here: an Instant Pot changed how I batch cook after those long shifts at the restaurant where I worked in Chicago—pressure cooking speeds things up up to 70%! Slow cookers are lazy-chef best friends—you toss stuff in before heading out and boom dinner waits when you’re home tired AF.
An air fryer? Not just trendy nonsense; less oil means healthier crispy textures which fit perfectly into meal planning focused on balance without sacrificing flavor—or texture because nobody wants soggy fries or limp chicken wings… except maybe my dog Fido who has zero standards.
Measuring Tools (Cups, Spoons, Scales)
I know it’s tempting to eyeball everything but measuring cups/spoons ensure consistency especially if you’re doubling recipes or trying new dishes from blogs like mine here—trust me on this one after accidentally dumping triple salt amounts once… ouch.
Food Safety Guidelines for Meal Prep
Safe Food Handling Practices (Washing Hands & Preventing Cross-Contamination)
This may sound obvious but washing hands properly before/during prep saved many headaches—and people always forget proper hand hygiene leads to less food poisoning risk! Also separate raw meat utensils from vegetables otherwise germs party hard on your plate later… nasty surprise incoming!
Proper Cooking Temperatures (For Different Types of Food)
- Poultry should reach internal temp of 165°F (74°C) – USDA-approved safe zone.
- Ground beef needs at least 160°F (71°C).
- Fish clocks at around 145°F (63°C).
I remember once we served undercooked chicken breasts once—not pretty… don’t do that!
Cooling and Storage Techniques (Rapid Cooling & Refrigerator Temperature)
The trick here? Don’t leave hot foods sitting around room temperature too long because bacteria multiply fast between 40°F–140°F (4°C–60°C). Spread out large batches shallowly so heat dissipates quick—the kitchen staff called it “cooling rack party” when we did this right.
Airtight containers go hand-in-hand ensuring no moisture loss nor weird fridge odors mingling inside your Tupperware jungle.
Reheating Guidelines (Safe Temperatures & Methods)
This one’s simple: reheat leftovers until internal temps hit 165°F (74°C)—it kills lingering nasties.
If using microwave remember uneven heating zones so stir midway through heating cycles if possible.
I admit though sometimes when exhausted after shifts I’d just zap willy-nilly hoping for best results… not recommended but hey I’m human too!
Shelf Life of Prepared Foods
You want your efforts rewarded without risking health scares:
– Most cooked meals keep well refrigerated for around 4-5 days
– Salads with dressings added last shorter times unless dressings kept separately
– Soups/stews might freeze well beyond weeks discussed later
I wrote about this before in my guide to Food Safety Tips, check that out for more deep dives.
Planning Your Meal Prep Menu
Choosing Recipes Considering Dietary Needs & Time Constraints
Nail down what YOU want first – preferences matter big time here.
I’ve learned clients come with allergies or lifestyles changing menus drastically—in one stint at Chicago restaurant kitchen we got vegan guests daily so adapting became survival skills.
The golden rule? Start simple then scale complexity later once confidence grows—you don’t wanna burn yourself out early AND end up tossing whole batches into trash bin due boredom/fatigue.* Every mistake is a lesson *
Create a Shopping List Organized By Store Sections
This sounds mundane but holy heck does it save time wandering aisles aimlessly searching last-minute items.
The trick is grouping by sections:
- Produce/Vegetables/Fruits
- Dairy/Eggs/Cheeses
- Breads/Pastas/Grains
- Canned/Jarred Goods
Mise en place applies outside kitchen walls too apparently…
Batches Cooking Strategies: Maximize Efficiency & Minimize Waste
You’ll wanna batch cook staples like grains/proteins + roast veggies all together often using sheet pans or multi-pot combos saving cleanup drama.
The first time I tried batch-cooking chicken thighs alongside roasted root vegetables was legendary—but hey initially burned one tray ’cause distracted talking nonsense with sous-chefs – don’t do that lol.
If unsure about portions try weighing ingredients precisely using scales—which ties back neatly into why measuring tools are critical aka no guessing games needed.
(Check out also “Mastering Batch Cooking: Simple Steps for Delicious, Stress-Free Weeknight Meals”) helps nail efficiency strategies.)
Portioning & Packaging Meals Appropriately
I cannot stress enough picking container sizes fitting hunger levels exactly; either oversized means soggy sad leftovers OR undersized causes mid-afternoon hanger attacks.
Mise en place again guides choices here—portion protein ~4-6 oz per meal depends on activity level; grains/carb sides balanced accordingly along fresh/raw veg elements thrown somewhere.
Avoid packing wet salad dressings inside same box as lettuce leaves unless dressing stored apart separately else sogginess nightmare guaranteed!
Meal Prep Recipes For Breakfast, Lunch & Dinner
Breakfast Ideas
Overnight oats are absolute lifesavers especially if mornings suck—which mine definitely did after night shifts back then..I usually combined rolled oats , almond milk , chia seeds , honey , cinnamon plus frozen berries . Tossed overnight into mason jars ready-to-go next day .
Ingredients :
- 1 cup rolled oats
- 1 cup almond milk
- 1 tbsp chia seeds
- 1 tsp honey or maple syrup
- ½ tsp cinnamon powder
- ½ cup frozen mixed berries
Instructions:
- Mix oats , almond milk , chia seeds , honey & cinnamon thoroughly in each jar .Add frozen berries on top .Seal jars tightly .Place in fridge overnight . Eat cold or warm briefly before eating .Keep refrigerated till consumption within max two days ideally .Don’t panic ;we can fix this if liquid separates slightly just stir !
Lunch Ideas : Salads , Grain Bowls & Wraps : Salads may seem tricky because soggy greens kill enthusiasm fast.I swear layering ingredients starting with sturdy veggies bottom layer followed by proteins/grains topped leafy greens + dressings stored separately works wonders . Ingredients example – Mexican grain bowl :
- ½ cup cooked quinoa / rice mixture
- ½ cup black beans rinsed/drained
- ¼ cup diced tomatoes${REPLACE_WITH_FINAL_ARTICLE} Do note only relevant parts appear above.
By: Marcus ChenWeek-by-Week Meal Prep Calendar
One of the biggest challenges for new meal preppers is knowing what to cook and when. A structured weekly calendar takes the guesswork out of the process and builds your skills progressively. Below is a four-week plan that starts simple and gradually introduces more complex techniques.
Week 1: The Basics
Focus on just three components: one grain, one protein, and one roasted vegetable. Cook a large batch of rice or quinoa, grill or bake chicken breasts, and roast a sheet pan of mixed vegetables. Portion everything into containers for lunches throughout the week. This teaches you the fundamentals of batch cooking without feeling overwhelming.
Week 2: Adding Variety
Build on week one by preparing two different proteins (such as chicken and ground turkey) and two grain bases (rice and pasta). Add a simple sauce or dressing that you make from scratch. Rotate combinations throughout the week so Monday’s chicken-rice bowl becomes Wednesday’s chicken-pasta with different vegetables.
Week 3: Breakfast Integration
Expand your prep to include breakfasts. Add overnight oats, egg muffin cups, or breakfast burritos to your Sunday session. Continue with lunch components from week two, and start prepping one dinner component such as a soup or stew that freezes well.
Week 4: Full Week Coverage
By now you should feel comfortable handling a full prep session. Prepare breakfasts, lunches, and at least three dinners. Introduce a new technique such as marinating proteins overnight or making your own spice blends. At this point, meal prep becomes a natural part of your weekly routine rather than a chore.
Week Prep Focus Time Investment Meals Covered Skill Level Week 1 1 grain + 1 protein + 1 vegetable 1-1.5 hours 5 lunches Beginner Week 2 2 proteins + 2 grains + homemade sauce 2 hours 5 lunches + snacks Beginner-Intermediate Week 3 Lunches + breakfasts + 1 freezer meal 2.5-3 hours 5 breakfasts + 5 lunches Intermediate Week 4 Full week: breakfasts + lunches + dinners 3-4 hours 5 breakfasts + 5 lunches + 3 dinners Intermediate-Advanced Essential Kitchen Tools for Efficient Meal Prep
Having the right equipment makes the difference between a streamlined prep session and a frustrating afternoon in the kitchen. You do not need to buy everything at once, but building your tool kit over time will significantly improve your efficiency.
Glass Meal Prep Containers
Glass containers with snap-lock lids are the gold standard for meal prep storage. Unlike plastic, glass does not absorb odors or stains, is microwave and oven safe, and lasts for years. Look for containers with multiple compartments so you can keep sauces separate from grains and proteins. A good starter set includes six to eight containers in two different sizes: one for full meals (around 34 ounces) and one for snacks or side portions (around 12 ounces).
Sheet Pans and Rimmed Baking Sheets
Half-sheet pans (18 by 13 inches) are essential for roasting large batches of vegetables and proteins simultaneously. Heavy-gauge aluminum conducts heat evenly and resists warping. Having at least two sheet pans lets you roast different items at the same time, cutting your prep time significantly. Line them with parchment paper for easy cleanup.
A Quality Chef’s Knife
A sharp 8-inch chef’s knife handles the vast majority of meal prep cutting tasks. It slices through proteins, dices vegetables, and minces herbs efficiently. Invest in a single quality knife rather than a full block set, and keep it sharp with a honing steel before each prep session. A sharp knife is safer and faster than a dull one.
Digital Kitchen Scale
Weighing ingredients rather than using volume measurements ensures consistent portions and accurate recipes. This is particularly important for meal prep because small inaccuracies multiply across a week’s worth of food. A basic digital scale that measures in both grams and ounces costs under twenty dollars and pays for itself through reduced food waste.
Instant-Read Thermometer
Food safety is non-negotiable in meal prep, and an instant-read thermometer removes all guesswork from protein doneness. Check that chicken reaches 165F, ground meat hits 160F, and fish reaches 145F. This one tool prevents both undercooked and overcooked food, saving you from foodborne illness and dry, rubbery proteins alike.
Tool Primary Use in Meal Prep Approximate Cost Priority Level Glass containers (8-pack) Storage and portioning $25-40 Essential Half-sheet pans (2) Batch roasting $15-25 Essential 8-inch chef’s knife All cutting tasks $30-80 Essential Digital kitchen scale Accurate portioning $10-20 Essential Instant-read thermometer Food safety verification $10-25 Essential Immersion blender Soups, sauces, dressings $20-40 Recommended Rice cooker Hands-free grain cooking $20-50 Recommended Salad spinner Washing and drying greens $15-25 Nice to have Organization Tips for Prep Day
Before you start cooking, lay out all your containers, label them with the day of the week, and set up stations: one for chopping, one for cooking, and one for assembly. This assembly-line approach mirrors what professional kitchens do and can cut your total prep time by 30 to 40 percent. Always start with the items that take longest to cook (like grains and roasted proteins) so they work in the background while you prepare quicker components.
Frequently Asked Questions
How long can meal prepped food safely stay in the refrigerator?
Most cooked meal prep dishes stay safe for 3 to 5 days when stored in airtight containers at or below 40F. Dishes containing dairy or seafood should be consumed within 3 days. For anything you will not eat within that window, freeze it immediately after cooling to maintain quality and safety.
Can I meal prep if I have a small kitchen with limited counter space?
Absolutely. Focus on one-pot and sheet-pan meals that require minimal equipment. Prep in stages rather than all at once, cleaning as you go to free up counter space. A small kitchen actually benefits from meal prep because it forces you to be organized and efficient with your workspace.
How do I prevent meal prep food from getting soggy?
Store wet and dry components separately. Keep dressings, sauces, and juicy vegetables in separate small containers and combine them just before eating. For salads, layer sturdy ingredients at the bottom and delicate greens on top. Grains and proteins should be cooled completely before sealing containers to prevent condensation.
Is meal prep actually cheaper than eating out?
On average, meal prepping costs between 3 and 5 dollars per meal compared to 10 to 15 dollars for restaurant or takeout meals. Over a month, this translates to savings of 200 to 400 dollars for a single person. Buying ingredients in bulk, using seasonal produce, and reducing food waste through planned portions all contribute to the cost savings.
Sources & References