A pie crust either shatters into visible layers when a fork breaks through it, or it collapses into something closer to a cracker. The difference between the two is rarely the recipe. Most crust recipes call for the same ratio of flour, fat, water and salt, and produce wildly different results depending on what happens to the butter between the bowl and the oven.
Flake comes from fat staying in distinct sheets inside the dough rather than blending into it. When those sheets of butter hit oven heat, the water trapped in the butter flashes to steam and pushes the surrounding layers of dough apart. A crust where the butter has smeared into the flour too early, or melted before it ever reached the oven, has no sheets left to separate, and no steam pockets to lift them.
None of this requires a special recipe. It requires butter that stays cold and solid until the last possible moment, water measured by weight instead of guessed by feel, one deliberate smearing step most home bakers skip, and two rests that give the gluten time to relax instead of fighting the rolling pin. The method below walks through all four, plus the visual cue that tells you, from the oven window, whether it worked.
- Butter temperature: straight from the refrigerator, cut cold, never softened
- Hydration: roughly 55 to 60 percent of the flour weight in ice water
- The smear step: one pass of fraisage after the dough barely holds together
- First rest: at least 1 hour, wrapped flat, before rolling
- Second rest: 30 minutes after shaping, before it goes in the oven
- Visual check: distinct pale-gold layers visible at the cut edge once baked
Flaky pie crust technique starts with what you can still see
The single best predictor of a flaky result is whether you can still see individual pieces of butter in the dough right up until it goes into the oven. A flaky pie crust technique is really a butter-visibility technique: as long as distinct, pea-sized or flatter pieces of fat remain separate from the surrounding flour, the dough has the structure it needs to flake once heat hits it.
The moment butter disappears into the flour, whether from warm hands, a warm kitchen, or overmixing, the dough stops being a laminated pastry and becomes closer to a shortbread. Shortbread is not a failure in its own right, but it is not what a pie crust recipe is asking for, and it bakes into something dense and sandy rather than layered.
Butter temperature: the ten-degree window that matters
Butter softens gradually, and by the time it feels pliable enough to press with a finger, it has already lost the structural rigidity that keeps it in distinct pieces during mixing. Cold, hard butter, cut directly from the refrigerator, holds its shape as it gets cut into the flour, which is exactly the point.
Cutting the butter into small cubes and returning it to the refrigerator or freezer for ten minutes before it ever touches flour buys insurance against a warm kitchen. In summer, or in a kitchen that runs warm, chilling the flour itself and even the mixing bowl beforehand keeps everything closer to that narrow cold window for longer during the actual mixing.
Hands transfer heat quickly, which is the practical argument for a food processor or a pastry cutter over fingers for the initial cutting-in stage. A few seconds of pulsing does the same mechanical work that fingers do, without the minute of body heat that fingers add along the way.
Hydration by weight, not by feel
Recipes that call for water by the tablespoon, added until the dough looks right, produce a different crust every time depending on flour humidity, the day’s temperature, and how the person adding it interprets right. Weighing the water as a percentage of the flour weight removes that guesswork.
Roughly 55 to 60 percent hydration, meaning 55 to 60 grams of ice water for every 100 grams of flour, gives a dough that holds together enough to roll without cracking but is not so wet that the gluten develops aggressively during mixing. Too little water and the dough crumbles apart under the rolling pin; too much and it turns tough as more gluten forms.
Ice water specifically, not just cold tap water, matters here for the same reason cold butter matters: every degree the water stays below room temperature is a degree the butter is not absorbing heat from its surroundings during mixing.
Comparing four common mixing habits
| Habit | What happens to the butter | Baked result |
|---|---|---|
| Softened butter, mixed by hand | blends into the flour almost entirely | dense, sandy, little visible flake |
| Cold cubes, food processor, short pulses | stays in pea-sized pieces | good flake, reliable rise |
| Cold cubes, warm room, slow hand-cutting | softens mid-process, some pieces smear | uneven flake, some dense spots |
| Cold cubes plus one fraisage pass | flattened into long, distinct sheets | the most visible layering of the four |
The fourth row is the one worth explaining in more detail, because it is the step most home bakers have never tried and the one that separates a good crust from a genuinely flaky one.
The smear step, known as fraisage
Fraisage is a French pastry technique where the just-barely-combined dough gets smeared flat against the counter with the heel of the hand, a small portion at a time, then gathered back together. It sounds like the opposite of what a nervous baker wants to do to fragile dough, and that instinct is understandable but wrong.
What fraisage actually does is flatten the remaining pieces of butter into thin, wide sheets rather than leaving them as rounder chunks. Thin sheets create thinner, more numerous layers of steam separation in the oven, which reads as finer, more distinct flake once baked, compared to the thicker, less consistent layers that rounder butter chunks produce.
The technique takes under a minute: after the dough first comes together in shaggy clumps, working with cold hands and moving quickly, push small handfuls away from you against the counter with the heel of your hand, then gather the smeared dough into a mass and repeat once more before shaping it into a disk. Two passes is enough. More than that starts warming the butter past the point fraisage is trying to protect.
The first rest: why the dough needs to relax before rolling
Mixing and fraisage both develop some gluten in the flour, and gluten that has just been worked resists stretching, which is exactly what rolling out a pie crust asks it to do. A dough rolled immediately after mixing fights back, springs into a smaller shape after each pass, and tears more easily at thin spots.
Wrapping the dough flat, as a disk rather than a ball, and refrigerating it for at least an hour lets the gluten relax and lets the butter fully re-solidify after the warmth of handling during fraisage. A flat disk chills faster and rolls out more evenly from the center than a rounded ball does, since a ball has more mass concentrated in the middle.
Overnight is better than an hour where time allows, since gluten relaxation and full re-chilling both continue improving well past the one-hour mark, and a dough made a day ahead rolls out noticeably more easily than one rushed straight from the mixing bowl.
Rolling without melting: kitchen temperature and marble
Rolling generates friction, and friction generates heat, which works directly against everything the earlier steps protected. A marble or granite rolling surface, kept cool, absorbs heat away from the dough as it rolls, unlike a wooden counter or a warm laminate surface that holds heat closer to the dough.
Rolling from the center outward in short strokes, turning the dough a quarter turn between strokes rather than rolling back and forth repeatedly over the same spot, distributes the work more evenly and reduces the total handling time the dough spends warming under your hands and the pin.
If the dough starts sticking, softening at the edges, or becoming difficult to move, the fix is not more flour worked into the surface, which changes the hydration ratio you weighed out earlier. The fix is ten minutes back in the refrigerator, dough and all, before continuing.
The second rest: chilling the shaped shell before baking
Once the dough is rolled and fitted into the pan, crimped and shaped, it has been stretched and handled again, undoing some of the cold, rigid structure the first rest restored. A second rest, at least 30 minutes in the refrigerator or 15 in the freezer, re-solidifies the butter one more time before oven heat hits it.
This second rest also relaxes the gluten in its final shape, which is the direct fix for a crust that slumps down the sides of the pan during baking, since dough that goes into the oven still under tension from stretching tends to shrink back toward its more relaxed, smaller shape as it heats. Skipping this step is one of the most common reasons a carefully laminated crust still bakes up shorter and denser than expected.
A crust destined for a custard or cream filling, like the pastry base under a properly set lemon tart, benefits even more from this second chill, since a fully rigid, cold shell holds its shape better against a wet filling than one that goes in still slightly soft.
Reading the baked edge: what tells you it worked
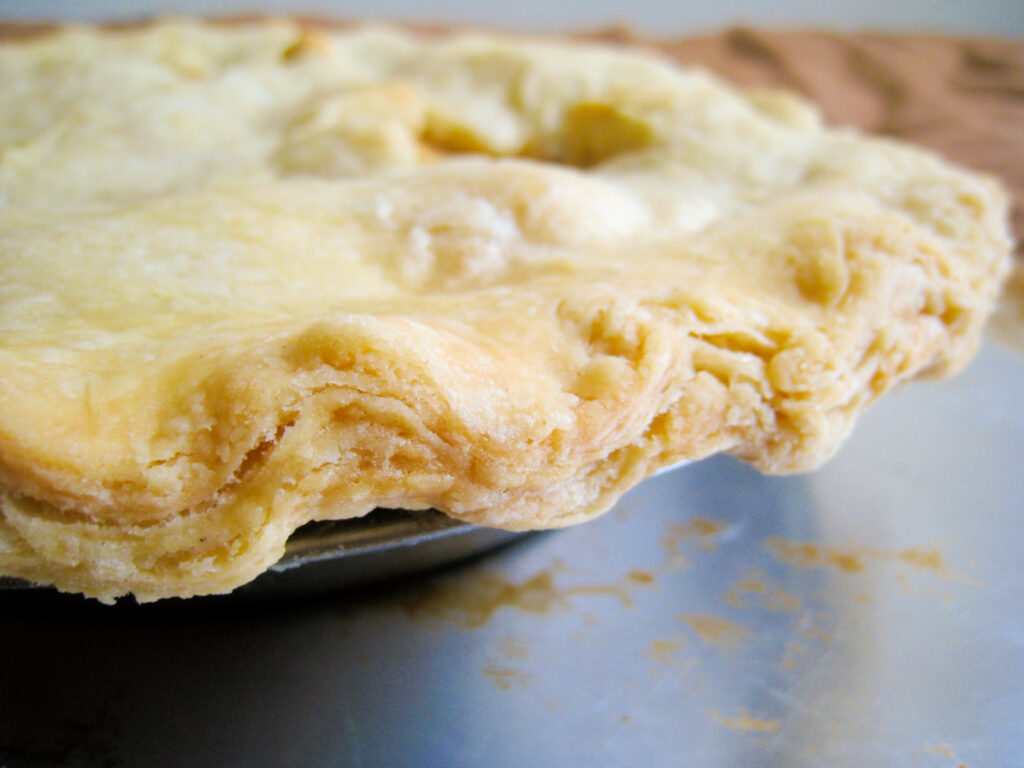
The clearest confirmation of a flaky pie crust technique done correctly shows up at the cut edge of the finished crust, not in how the dough looked going in. Distinct, pale-gold layers, visible as thin horizontal lines when you cut through the baked crust, mean the butter stayed in sheets all the way to the oven and created real separation as it melted and steamed.
A crust that instead looks uniformly dense and sandy in cross-section, with no visible layering, tells you the butter smeared into the flour at some point before baking, whether during mixing, rolling, or a rest that ran too warm. That crust is not ruined, but it has become a different, denser style of pastry than the flaky version the technique is aiming for.
A well-browned, slightly domed top edge on a two-crust pie, rather than a flat or sunken one, is a secondary sign that the layers held their structure and lifted properly rather than collapsing together during the bake.
Step by step, start to finish
- Chill the flour and cut the butter into small cubes, then chill the cubes again for ten minutes. This buys time in a warm kitchen.
- Cut the cold butter into the flour with a food processor or pastry cutter, in short pulses. Stop when pieces are pea-sized to flat, not powder.
- Add ice water gradually, a portion of the weighed amount at a time. Stop as soon as the dough holds together when pressed.
- Turn the shaggy dough onto the counter and smear it flat with the heel of your hand, twice. This is the fraisage step. Work fast.
- Gather the dough into a flat disk, wrap it, and refrigerate for at least one hour. Overnight is better if time allows.
- Roll from the center outward on a cool surface, turning the dough between strokes. Chill again if it starts to soften.
- Fit the rolled dough into the pan, crimp the edge, and refrigerate a second time for 30 minutes. Do not skip this rest.
- Bake according to the recipe, then check the cut edge once cooled. Visible layers confirm the technique worked.
Nothing in this process changes the ratio printed on a standard pie recipe. It changes what happens to the same flour, butter, water and salt between the bowl and the oven, and that handling is almost always the actual difference between a crust that flakes and one that does not.
Frequently Asked Questions
Can I use a stand mixer instead of a food processor for cutting in butter?
Yes, with the paddle attachment on the lowest speed and very short bursts, checking frequently so the butter does not overmix into the flour. A food processor is faster and easier to control for this specific step, but a stand mixer works if that is what you have.
Why does my crimped edge always slump down the side of the pan?
This is almost always a skipped or shortened second rest. The dough goes into the oven still under tension from rolling and shaping, and it relaxes back toward a flatter shape as it heats. A full 30-minute chill after fitting the dough into the pan fixes most slumping.
Is it safe to use dough that has raw egg wash brushed on it before baking?
Yes, once baked; the egg wash cooks through during the oven time along with the crust itself. Raw egg wash should still be handled with the same basic care as any raw egg, meaning washed hands after handling and no tasting of the unbaked, egg-washed dough.
How long can shaped, unbaked pie dough sit in the refrigerator before baking?
Up to two days, wrapped tightly, without meaningfully affecting the result. Beyond that, the dough can pick up refrigerator odors and the surface can dry out slightly, though a light water brush or extra egg wash can still rescue it.
Can I freeze the dough instead of just refrigerating it?
Yes, either as a flat disk before rolling or already fitted into the pan. A frozen disk needs a full day in the refrigerator to thaw evenly before rolling, while a fitted, frozen shell can often go straight into the oven from frozen with a slightly longer bake time.