Introduction: The Allure of the Butter Candle
Okay, so picture this: you’re hosting a dinner party — maybe something casual or perhaps a bit fancy — but you want that one wow-factor, right? Something that sparks conversation before anyone even tastes your food. Enter the butter candle. Now, I know what you’re thinking: “Marcus, come on.. butter as a candle?” But trust me on this one — these edible candles are the perfect blend of quirky charm and straight-up deliciousness.
Butter candles aren’t just about melted butter pooling on your plate (although that’s pretty awesome). They are statement pieces—almost like culinary art—that bring people together around the table. At the restaurant where I worked in Chicago, we tried every gimmick under the sun to impress diners; nothing stuck like interactive food experiences did. And man, those moments when guests light a little wick and watch buttery goodness melt away? Pure magic.
This guide is gonna walk you through everything from what exactly a butter candle is (spoiler alert: it’s not witchcraft), all the way to serving them safely with style at your next gathering.
What is a Butter Candle?
Alright, technically speaking—a butter candle is flavored butter molded into… yep, you guessed it—a candle shape, complete with an actual wick embedded right in the center. When lit, the wick burns gently while melting the surrounding butter, which then becomes this warm dipping sauce ready for bread or veggies.
I mean, how genius is that? An appetizer that doubles as ambiance! It’s an edible candle that combines utility with pure delight—and for someone like me who’s spent years troubleshooting flame-related disasters in hot kitchens (including accidentally torching my apron once—don’t ask), this concept had me hooked instantly.
The cool part here is it straddles cooking techniques and presentation perfectly; you’re essentially creating your own mini fondue setup but without all those bulky pots and fuss. Plus, since clarified butter burns cleaner (more on that later), it’s also fairly practical if done right.
Gathering Your Supplies
The Basics You’ll Need
- Butter: Go high quality—unsalted European-style if possible; it melts better and tastes richer.
- Wick: Cotton wicks work best. Food-safe twine can be an alternative but be careful about chemical coatings!
- Molds: Think small cups, ramekins (my favorite), ice cube trays—even silicone molds shaped funnily for flair.
- Flavorings: Herbs like rosemary or thyme, spices such as smoked paprika or cracked black pepper; garlic works wonders too.
A Quick Story About Mise en Place… And Why It Matters Here
You’d think with something this simple mise en place wouldn’t be necessary—but oh boy—it really helps keep things smooth. I learned this lesson painfully once when rushing through prep at my tiny home kitchen after long shifts in Chicago kitchens. Without having everything measured out beforehand—the infused herbs ready to go—the whole thing turned into chaos fast. Melted butter everywhere except where intended—that sticky mess will haunt your nightmares!
Crafting Your Butter Candle Masterpiece
The Step-by-Step Process
- Melt Your Butter Gently: Use low heat in a double boiler or microwave (yes! microwaves have their place—I stand by it!). The goal here isn’t scorching but liquefying smoothly.
- Add Flavorings: Stir in minced herbs/spices/garlic promptly so they infuse evenly while warm.
- Secur eYour Wick: Tie one end of your wick securely inside your mold base – sometimes taping works too – making sure it stands upright.
- Pour Flavored Butter Into Mold:, covering around wick carefully without disturbing its position.
- Refrigerate Until Firm:, usually 1-2 hours should suffice.
- Dismantle With Care:, slide out your molded creation slowly – patience pays off here to avoid cracks or breakage.
If you mess up along any step don’t panic — we can fix this! Every mistake is a lesson after all.
Serving with Style
The Presentation Game Is Real
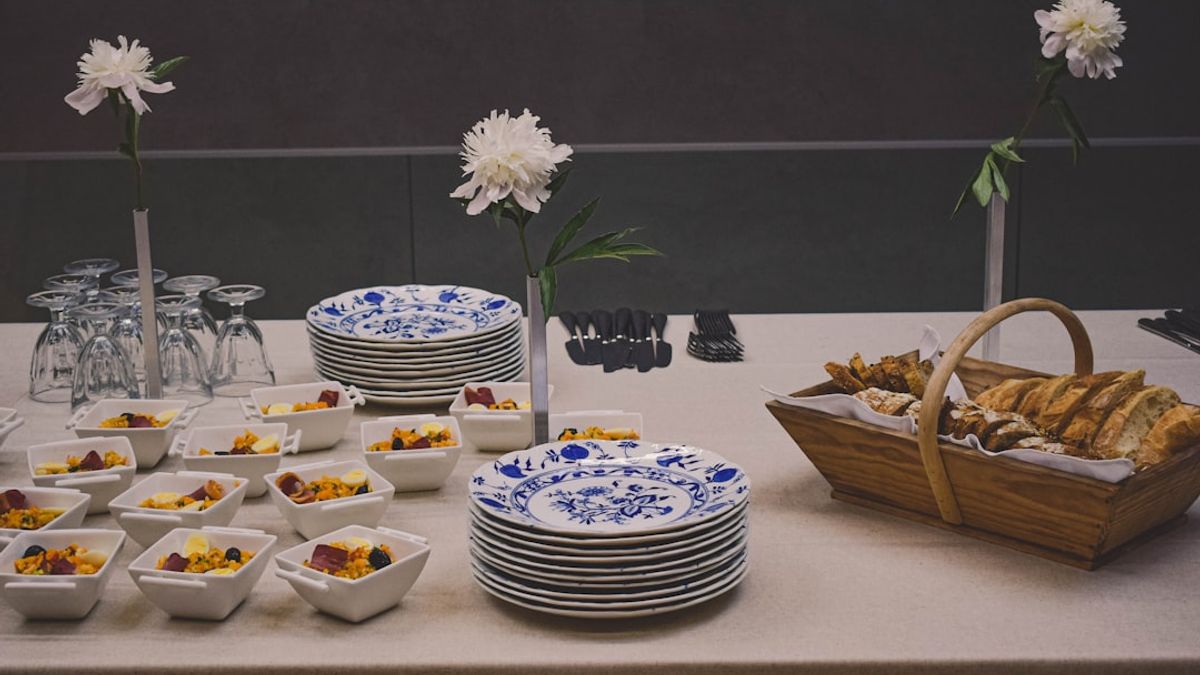
This part—well—you want to bring some theatricality without turning into a circus act obviously. Set each butter candle atop heat-resistant dishes because melted butter + regular plates = disaster waiting to happen (learned that via many late nights cleaning grease-slick floors).
Your guests will love lighting their individual edible candles—watching dripping golden pools form beneath—and dipping crusty breads or crunchy crackers straight into warm buttery goodness feels surprisingly indulgent yet simple enough for casual vibes too.
- Baguette slices toasted just right? Perfect pairing here.
- A fresh medley of veggies adds color & texture contrast worth bragging about at parties;
- If you’re feeling extra creative check out my detailed guide on Flavoring Butter for combos that’ll knock socks off.
Flavor Combinations to Inspire
This section alone could fill volumes because flavor combos with these edible candles run wild—from sweet honey-garlic blends reminiscent of grandma’s kitchen mornings—to spicy jalapeño-infused versions packing serious punch at night gatherings.
I personally dig rosemary-thyme-smoked paprika blend most; reminds me of slow roasts back at the restaurant where I worked in Chicago during winter months — fragrant warmth filling entire dining room humbly paired with rustic sourdough loaves freshly sliced nearby… Ahhh memories!
- Savory ideas: rosemary & garlic | smoked paprika & black pepper | lemon zest & chive
- Sweet notes?: maple syrup & cinnamon | honey & vanilla bean | brown sugar & nutmeg
- Create layered candles mixing contrasting flavors—for example bottom half savory herb blend topped by sweet spiced layer above for drama both visual + taste-wise!
Tips for Success
A Few Pro Tricks To Nail It Every Time
- Clarify Your Butter For Cleaner Burning: Removing milk solids keeps flame steadier plus less smoky aroma spoiling experience. (I messed up here plenty early on when flames sputtered wildly ruining several demos.) . li > Wick Length Matters : Trim so exposed portion burns nicely without flaring dangerously high . Too short ? Candle extinguishes prematurely ; too long ? Potential fire hazard . li > Use Heat-Proof Dishes Always : Never underestimate melted grease spreading chaos ! li > Creative Touches Elevate Experience : Adding fresh herbs around base , small flowers , or even glitter designed for foods makes presentation pop . li > Don ’ t Rush Cooling Periods :</b> –&#160;Premature unmolding leads easily cracks . </ul> <p>
Oh! One more thing – safety always comes first (and yes I'm guilty myself sometimes overlooking tiny details). We’ll talk more below.
</p> <h2>Safety Precautions</h2> <h3>Keep Flames Friendly While Having Fun</h3> <p>
Seriously folks – use heat-resistant dishes only – ceramic ramekins work beautifully – no cheap plastic nonsense unless certified otherwise.
Never leave burning candles unattended – last thing you want is accidental fires during cozy evenings!
Keep flammable stuff well clear away.
Supervise kiddos carefully – flames + curious hands never mix well.
If possible have fire extinguisher handy just in case (not paranoid just pro).
At times I’ve caught myself distracted prepping sides causing near misses … don’t let history repeat itself!
</p> <h2>beyond The Basics: Butter Candle Variations</h2> <p>
Time to get fancy-fun:
</p><ul style="margin-left:20px;">
- Differents shapes/sizes using molds beyond ramekins – think geometric cubes / mini stars etc.; cool eye candy factor included.</ li >
- Create multi-layered beauties contrasting colors/flavors between layers letting guests peel each bite apart.</ li >
- Add edible flowers like nasturtiums/dandelions or sprinkle fine shimmer/glitter meant specifically for foods adding whimsy.</ li >
Conclusion
So yeah, if you’ve made it till here props — a lot goes behind making what looks deceptively simple a total showstopper centerpiece.
Butter candles do deliver unique interaction melded perfectly between aesthetic spectacle plus down-home good eats. Honestly, if | you’re wondering whether jumping onto yet another trendy appetizer bandwagon fits real cooking skillset,mind my controversial take: Microwaves definitely have their place even in pro setups, i’ll say again |(please don’t lynch me)—and&nb sp not every dish needs crafting strictly from scratch. Sometimes brilliance lies simplifying intricacies smartly sans compromising integrity—in other words, Here’s the secret: sometimes leveraging fun trends builds confidence stepping toward mastering classic foundations better. If interested exploring further, i wrote about seasoning mastery previously(https://cookingzone.org/global-kitchen-adventures-exploring-the-art-of-spice-blending-from-around-the-world/ pairs great with flavor experimentations mentioned earlier. Now get out there try igniting your own dinner party—with buttery flair literally melting hearts simultaneously! Don’t panic—we can fix any missteps en route anyway,
and hey… every mistake is indeed another lesson learned! By: Marcus Chen
My Take on This:
After decades refining professional kitchen skills including countless experiments blending culinary artistry and practical solutions—as well as surviving multiple flare-ups(!)—I bring firsthand insight translating complex cooking techniques into accessible steps anyone can follow successfully at home.
Why You Can Trust Me:
From managing high-pressure kitchens where precision meets creativity daily in Chicago restaurants—to noodling recipes solo cramped space tiny home kitchen—I’ve lived through challenges teaching why technique AND playful innovation must coexist harmoniously.
Check out my full knife skills breakdown if slicing herbs intrigues you next (—<a href="https://cookingzone.org/7-essential-knife-skills-every-home-cook-should-master/" target="_blank">)Mastering Knife Skills&) Or explore meal preps guides elsewhere on site keeping mise en place top-notch!
Happy Cooking!
Timeline: How to Plan a Stress-Free Dinner Party
The secret to a relaxed dinner party where you actually enjoy your own event is working backwards from the serving time. Professional chefs and event planners use detailed timelines to ensure everything comes together seamlessly. Here is a practical schedule that takes the guesswork out of hosting.
Two Weeks Before
Finalize your guest list and send invitations. Decide on a theme or cuisine direction. Check that you have enough plates, glasses, cutlery, and serving dishes. This is also the time to plan any showpiece elements like butter candles or elaborate centerpieces that might require special supplies.
One Week Before
Finalize your menu and create a detailed shopping list. Order any specialty items that your local grocery store may not carry. Plan your cooking schedule so you know which dishes can be made ahead, which need day-of preparation, and which must be served immediately.
Two Days Before
Do your major grocery shopping. Prepare any items that improve with time, such as marinades, pickled garnishes, or desserts that need to set. Clean and organize your kitchen so prep day goes smoothly.
The Day Before
Prepare as much as possible: chop vegetables, make sauces, assemble cold dishes, and mold your butter candles. Set the table and arrange your dining area. The more you accomplish today, the less stressed you will be tomorrow.
Day of the Party
| Time Before Guests Arrive | Task |
|---|---|
| 4-5 hours | Start slow-cooking or braising dishes that need long cook times |
| 3 hours | Prepare salads (without dressing), arrange cheese boards, prepare garnishes |
| 2 hours | Set out serving dishes, chill beverages, light any candles for ambiance |
| 1 hour | Cook proteins and last-minute hot dishes, heat bread, arrange butter candles on serving plates |
| 30 minutes | Final plating, dress salads, set out appetizers, adjust lighting |
| 15 minutes | Change clothes, take a breath, pour yourself a drink |
During the Party
The timeline does not stop when guests arrive. Plan for approximately 30 to 45 minutes of appetizers and drinks before the main course. This gives latecomers time to arrive and allows you to finish any final cooking steps. Light the butter candles just as guests sit down to maximize the theatrical effect and ensure the melted butter is at the perfect warm temperature for dipping.
Menu Ideas by Cuisine
Butter candles pair beautifully with a variety of cuisines. The key is matching the butter’s flavor infusion with complementary dishes. Here are complete menu suggestions organized by cuisine, each designed to highlight the butter candle as a centerpiece.
Rustic Italian Night
- Butter candle flavor: Roasted garlic and rosemary with sun-dried tomato flakes
- Bread: Ciabatta and grissini breadsticks
- Starter: Caprese salad with fresh mozzarella and basil
- Main: Braised short ribs with creamy polenta
- Dessert: Tiramisu or panna cotta
French Bistro Evening
- Butter candle flavor: Herbs de Provence with a hint of Dijon mustard
- Bread: Fresh baguette sliced on the bias
- Starter: French onion soup or salade Lyonnaise
- Main: Coq au vin or pan-seared duck breast
- Dessert: Chocolate mousse or tarte tatin
Mediterranean Feast
- Butter candle flavor: Lemon zest, oregano, and cracked black pepper
- Bread: Warm pita with za’atar flatbread
- Starter: Mezze platter with hummus, baba ganoush, and tabbouleh
- Main: Herb-crusted lamb chops or grilled whole fish
- Dessert: Baklava or orange blossom cake
Harvest Supper
- Butter candle flavor: Brown butter with sage and toasted walnuts
- Bread: Sourdough boule and cornbread muffins
- Starter: Butternut squash soup
- Main: Roasted chicken with root vegetables
- Dessert: Apple crisp with vanilla ice cream
| Cuisine | Recommended Butter Flavor | Best Bread Pairing | Ideal Season |
|---|---|---|---|
| Rustic Italian | Roasted garlic and rosemary | Ciabatta | Year-round |
| French Bistro | Herbs de Provence | Baguette | Spring or Fall |
| Mediterranean | Lemon zest and oregano | Pita and flatbread | Summer |
| Harvest Supper | Brown butter with sage | Sourdough boule | Autumn or Winter |
Frequently Asked Questions
How long does a butter candle burn before fully melting?
A standard butter candle made from one stick of butter (about 4 ounces) burns for approximately 20 to 30 minutes before fully melting. Larger candles made with 8 ounces of butter can last up to 45 minutes. Using clarified butter extends burn time slightly because the removed milk solids tend to cause sputtering that wastes fuel.
Are butter candles safe for indoor use?
Yes, butter candles are safe for indoor use when proper precautions are followed. Always place them on heat-resistant dishes such as ceramic plates or ramekins. Never leave a burning butter candle unattended, and keep it away from flammable materials. The flame is small and the burn temperature is relatively low, making them safer than traditional paraffin candles.
Can I make butter candles with vegan butter?
Vegan butter substitutes can work but require some adjustments. Coconut oil-based vegan butters produce the most reliable results because coconut oil has a higher melting point and burns more cleanly. The flavor profile will differ from dairy butter, so experiment with herb infusions that complement the base. Expect a slightly shorter burn time compared to dairy butter.
How far in advance can I make butter candles?
Butter candles can be prepared up to three days in advance and stored in the refrigerator. Cover them loosely with plastic wrap to prevent the butter from absorbing refrigerator odors. Remove them from the fridge 15 to 20 minutes before serving so the outer layer softens slightly, which allows for smoother melting when lit.